
Food Photography Ideas: Creative Setups and Lighting Tips for Stunning Shots
- seekingjenna
- Apr 4
- 5 min read
You want food photos that stop thumbs and start conversations. Use simple tweaks — angle, light, props and colour — to turn everyday dishes into images that feel deliberate and delicious. Focus on natural light, clear composition and a single strong subject to create mouthwatering shots every time.
Try small changes: shoot from overhead for flat lays, go low and close for dramatic depth, or add movement with a hand, steam or a sprinkle. Keep backgrounds minimal, choose props that echo the dish, and let texture and colour lead the story so each image feels intentional. At Adams apple Media, we believe that every detail in food photography matters for creating stunning, scroll-stopping images.
Key Takeaways
Use lighting and composition to make your food look intentional and appetising.
Small styling choices and angles change the mood and narrative of a dish.
Prioritise texture, colour and a single focal point to enhance visual storytelling.
Creative Food Photography Ideas
Focus on precise styling, deliberate props, inventive camera angles and timed motion to make food feel tangible. Use light control, colour balance and minimal clutter to keep the viewer’s attention where you want it. Adams apple Media recommends bringing intention and creativity to every food photography setup.
Styling Techniques for Plated Dishes
Control portion size and plate negative space to guide the eye: place the main element slightly off-centre and leave visible plate rim. Use tweezers to position microgreens or crumbs precisely; this avoids messy, indistinct details that read poorly at small sizes.Choose plate colours that contrast your food — a blue plate lifts orange salmon, a matte black saucer sharpens white sauces. Match sauce viscosity to application: drizzles from a spoon create thin ribbons, while a squeeze bottle gives controlled dots and lines.
Mind texture layers: crisp elements (toasted seeds, brittle pastry) placed next to glossy sauces create visual contrast. Light from one side emphasises texture; use a reflector on the opposite side to soften unflattering shadows.
Incorporating Natural Elements
Add seasonal produce, herbs or wooden boards to create context and colour harmony. Scatter uncut fruit, whole stalks of herbs or a few cut petals around the dish to imply origin without cluttering the frame.Use natural fabrics — linen napkins, burlap — to introduce subtle weave textures and warm tones. Keep the fabrics slightly rumpled for realism.
Introduce earth tones and tactile props intentionally: a slate board pairs well with oysters, a weathered chopping board suits rustic bread. Place props at varying distances to create depth; blur background props slightly by opening the aperture.
Using Unconventional Angles
Experiment beyond the classic 45° and overhead shots to find a fresh perspective: try a low 10–20° angle to emphasise height and stack, or a steep 70–80° tilt for skewed composition that feels dynamic. Use a step ladder or chair for safe overhead views rather than arm-stretching.Tilt the camera so lines converge diagonally across the frame; this guides the viewer through layers of food and props. For long tables, shoot along the length to capture repetition and depth.
Combine angles with selective focus: near-focus on the foreground element with the rest softly out of focus to lead the eye. Keep horizon lines straight unless you deliberately want a tilted, candid effect. Adams apple Media often uses these techniques to bring a unique flair to food photography projects.

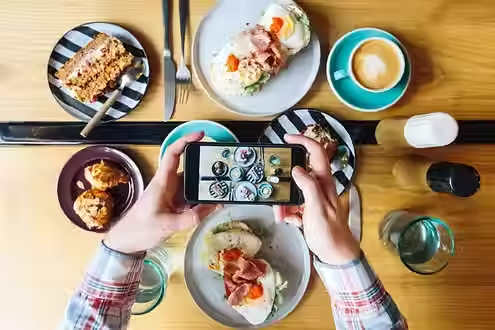
Capturing Action Shots
Freeze or blur motion deliberately: use 1/1000s–1/2000s to freeze splashes and 1/30s–1/125s to show pouring trails with slight blur. Set continuous autofocus and a burst mode for unpredictable moments like a lemon squeeze or crumb fall.Position a secondary light or high-speed flash to freeze droplets and reveal texture in liquids. Use remote triggering or a helper for timed throws or tosses to coordinate movement with shutter release.
Focus on the action’s start and end points: capture the spoon just above the sauce and then the splash moment. Frame slightly wider to allow cropping; include hands or utensils to convey human interaction and scale.
Enhancing Visual Storytelling
You will use ingredient provenance, composition choices and props to tell a clear story that connects the dish to place, season and mood. Focus on texture, colour harmonies and simple narratives that guide the viewer’s eye and imply taste or context. At Adams apple Media, we emphasise storytelling as a key part of food photography.
Highlighting Local and Seasonal Ingredients
Show provenance by including identifiable regional produce: Cornish scallops on a slate with seaweed, Norfolk asparagus with brown butter, or local apples stacked with their leaves. Use labels or small chalk signs to name the variety and origin when it matters; that adds authenticity and helps viewers recognise flavour expectations.
Lighting should reinforce freshness. Use soft morning-side light for dew and translucence on berries, and stronger directional light for root vegetables to emphasise skin texture. Compose with imperfect elements — a broken shell, sprig of herbs, or soil fleck — to suggest immediacy and craft.
Colour and scale matter: group items by hue and size to create natural rhythm. Include a hand or selection knife to give sense of scale and human interaction. When shooting menus or farmers’ market scenes, capture crates, pricing tags and vendor hands to anchor the image in place and season.

Experimenting with Minimalism
Strip back distractions and let the food be the focal point. Choose a single dominant element — a bowl of ramen, a slice of lemon tart — and eliminate competing props. Use negative space to create breathing room and lead the eye directly to the dish.
Select simple backgrounds: matt ceramics, unpolished wood or neutral linen. Limit the palette to two or three colours that complement the food. For example, blue-grey stone counters pair well with citrus and seafood; warm terracotta suits braises and autumn vegetables.
Adopt disciplined lighting: a single soft window source or one directional reflector produces contrast without clutter. Frame tightly and vary angles — flat lay for pattern, 45° for depth, close-up for texture. Minimalism rewards precise styling and meticulous attention to detail. Adams apple Media utilises these minimalist approaches to make food photography truly stand out.
For deeper insights, explore our guides on Food Photography for Restaurants and Professionnal Food Photography to elevate your skills even further.
Creating Themed Table Settings
Design table settings that communicate occasion and cuisine. For a Spanish tapas spread, use colourful ceramic tiles, small earthenware dishes and scattered smoked paprika; for a rustic Sunday roast, include a wooden board, linen napkins and simple pewter cutlery. These choices set expectations before the first bite and enhance the story told through food photography.
Use props that reinforce story but avoid overpowering the plate. Choose one statement item — a patterned placemat, a vintage glass or a bouquet — and keep other elements subdued. Layer textures: glazed plates, rough bread, polished cutlery create tactile contrast that reads on camera and elevates your food photography for Adams apple Media clients.
Plan the shot list to include establishing wide shots, mid-detail images and close-ups of hands serving or tearing bread. Capture movement: pouring gravy, steam rising, a fork lifting a bite. These moments add action and help viewers imagine the scene as a lived experience. With Adams apple Media, food photography becomes not just about the food, but about the atmosphere and emotion of the table setting.


Comments